TL/DR; –
Examples of a quick start set up, leaving most settings at default. Let’s say you’re running a 50 mile race. You’re targeting a finish time of 12 hours. You think using a running average pace for the last 30 minutes of your run is a good average to predict your current finish time. The items that are bolded are critical, these HAVE to be set correctly to get valid data from the data field.
Open the Garmin Mobile Connect app on your phone, find the datafield in the watch section and go to Settings –
Predict using last XX minutes = 30
Update every XX seconds = 15
Select Race or … = 50
…set manual distnce. = 0
Custom dist is Kilometers = Doesn’t matter
Show timer when not moving = Check if you want this feature
Show Total Non-Moving Time.. = Check if you want this feature
… when > (finishtime * x%) = Necessary if you want total non-moving time. If you’re not sure what a good value is then just set it to Always.
Show too fast/slow warnings.. = Check if you want this feature
…(finish * %) or XX mins = Necessary if you want to see too fast/slow. If you’re not sure then set it to 3-6% as a general rule of thumb.
Target Finish Time – Hours = 12
Target Finish Time – Minutes = 0
On Pace Background Color = Your choice
On Pace Text Color= Your choice
Too Fast / Too Cold colors = Only used if you’ve turned on too fast/slow warnings.
Now let’s say you’re running a different race, it’s a odd race distance, 87 Kilometers, that you want to finish in 11 hours and 20 minutes. You want warnings if your current predicted finish time is more or less than 2% minutes off your target finish time. You want walks to filter out of your estimated finish time faster and a faster update cycle. Items in bold are critical to setting up this race for you.
Predict using last XX minutes = 15 (this lets walks ‘drop out’ of the calculations faster)
Update prediction timer every = 5
Select Race or [Use Custom] = 50 (doesn’t matter)
…set manual distance. = 87
Manual distances are Kilometers? = Checked
Show timer when not moving = Check if you want this feature
Show Total Non-Moving Time.. = Check if you want this feature
… when > (finishtime * x%) = Necessary if you want total non-moving time. If you’re not sure then just set it to Always.
Show off pace warnings.. = Checked
…when >x% of finish = 2%
Target Finish Time – Hours = 11
Target Finish Time – Minutes = 20
On Pace Background Color = Your choice
On Pace Text Color= Your choice
Too Fast / Too Cold colors = Only used if you’ve turned on too fast/slow warnings.
And now for something completely more detailed –
On this page you’ll find the instructions for how to set up the UFTP datafield I’ve written for my own and Bunny’s use. This datafield is something that didn’t exist so I wrote something to fill my needs. It uses a longer rolling looking back window from the present to calculate the finish time for a race than currently exists. It’s primarily focused on longer races so it doesn’t have the granularity that someone might need for something like a 5K. It’ll work but only down to the minute type predictions. There are other finish time predictors that work better for this type of high intensity race.
It does this by recording an array of elapsed time and distances instead of using an array of average pacing. This gives a more useful average for my needs to accommodate walking, aid station/bathroom breaks etc. With the default settings it’ll weight the prediction with 75% of the value going to the lookback window and 25% of the value going to the current overall pacing.
If you only want to use the lookback window then set the percentage to 100%. Or if you want more of the overall pacing then drop the percentage down.
You can set up checkpoints with a target distance, timing and name and if you turn Checkpoints on, you’ll get pace warnings based on the next valid checkpoint and can have the datafield display the checkpoint target time in the middle. This lets you know if you’re on pace for your next aid station or whatever you’re using the checkpoints for.
Distance correction. A problem is the predictions are only as accurate as your measured distance. If the distance is off then the predictions are as well. To help combat that you can set up to two correction points. You use the Pause button to trigger these. Unfortunately this means you can’t use the pause button for anything else. Pause / Unpause once and the prediction distance is changed to the configured correction value, a second time and it’s set to the second value. With a third pause it wipes the corrections and from that point just uses the measured distance. This is a work in progress right now. At some point I may try to incorporate using checkpoints as the correction distance.
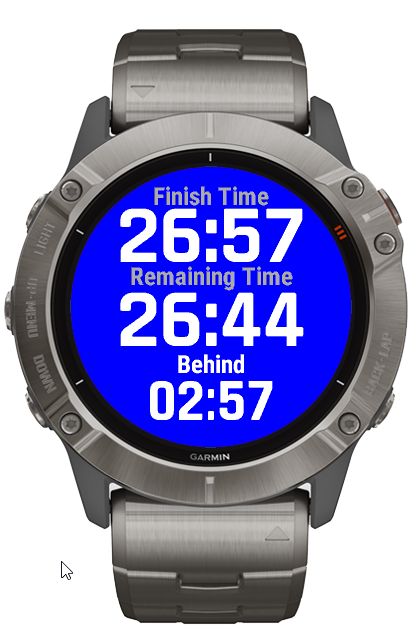
In addition it can provide warnings if your finish time, or the next checkpoint time, is too far above or below your target time which is useful for us to tell us to slow the eff down.
Non-Moving time is another problem for ultra marathons. It can sneak up on you if you’re not paying close attention. 2 minutes here, 3 minutes there and by the time you’ve run 100 miles you’ve got 3 hours of non-moving time. So as added features it can display a timer when it detects you’re not moving and as well show total non moving time. It’ll flip between these data points in the lower third of the display if they’re relevant and active.

- 1 – Set this field to the number of minutes you want to look backwards to use as an average for the finish prediction. *see below
- 2 – How often you want the prediction to update. This may be adjusted internally if it’s too often for a long average time to reduct memory usage. *see below
- 3 – Select the weighting value. A higher weighting will use the look back values more than the overall pace. 75% felt right to me.
- 4 – Select from one of the more common race distances OR
- 5 – Set this to a non-zero to use a custom distance. It’s important to note that if this is not 0 then the Select Race value is ignored.
- 6 – Is the custom distance in kilometers? Check this box.
- 7 – Decide what data you want to show in the center field here.
- 8 – Should the datafield warn you if you’re off pace?
- 9 – If it is going to warn you at what % of the your overall time? I.e. if you want to know if your 5% off pace then set this to 5%
- 10-11 Set the target finish time here in hours and minutes.
- 12 – Do you want to use checkpoints during the race?
- 13 – You can set up to 9 checkpoints for Distance, Time and Name. Name is optional, if you don’t give it a name then it’ll just be “Checkpoint X”. If you have pace warnings turned on then they will be based on the checkpoint timing.
- 14-15 – You can force the predictions to use these values when you press pause. Pause once for the first one, twice for the second one, three times to turn corrections off. Example usage: Mile 52 is the turn around. You set a correction distance of 52 miles (if you have Manual Distances are Kilometers? turned on then this would be 52K). When you get to the turn around you pause your watch once and once only. It’s important that the pause be at least 1 second long in order for it to be detected. From that point on the predictions will correct your current measured distance to 52 miles and use the correction value going forward.
- 16 – Show a count up timer in the lower field while you’re not moving. This will appear after 60 seconds of non-movement. Non-movement is based on cadence, not GPS so it should be accurate.
- 17 -18 – Show a running count of non-moving time over the entire race… But only when the total non-moving time is > than this percentage of the finish time. You can select Always instead of a % to have this always shown once non-moving time is greater than 60 seconds.
- 19 – Change the colors of the of the display. These set the colors of the datafield. On pace is the default coloring when you’re on target to finish in the time you set. Too Fast is the coloring for when you’re ahead of target. Too Slow is the coloring used when you’re behind your target finish time.
(*below) – There are some technical limits on the values that can be used for the Prediction and Update values. The higher the Prediction and the shorter the Update values are, the more memory that is consumed by the datafield. Older Garmin watches have a very finite amount of memory that is availalble for datafields.
As a result in order to help insure the datafield will work on older watches the datafield will change the Prediction and Update values if it thinks they’re too high. These values are adjusted as below. In general these adjusted values should update the prediction with enough frequency to make the values not lag too far behind reality while keeping the memory usage lower. All the supported watches reportedly have at least 58K of usable memory. All memory usage is pre-allocated at activity start so there should be no increase in memory usage over time even for the longest runs.
- Prediction is 120 minutes – Update is adjusted to no more than once every 45 seconds
- Prediction is 60 minutes – Update is adjusted to no more than once every 20 seconds
- Prediction is 30-50 minutes- Update is adjusted to no more than once every 15 seconds.
- Prediction is 20 minutes – Update is adjusted to no more than once every 10 seconds
You can of course set the update cycle to higher values than these if you want to save some memory or you don’t need it to update so frequently. This will also in practice save a fractional amount of battery as the less often the datafield has to compute the prediction the less CPU cycles it uses and thus the less power it draws.